| General Language | ||
|---|---|---|
 | Chapter 2. Introduction to C++ (The "C" of C++) |  |
| General Language | ||
|---|---|---|
| | Chapter 2. Introduction to C++ (The "C" of C++) | |
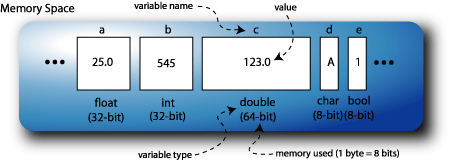
A variable is a data item stored in a block of memory that has been reserved for it. The type of the variable defines the amount of memory reserved. This is illustrated in Figure 2.6, “An example memory space with variables defined.”.
C++ supports many variable types, such as:
int integers ( -5, -1, 0, 1, 3 etc.)
char characters ( 'a', 'b', 'c', etc.)
float floating point numbers (4.5552324, 1.001, -4.5553 etc.)
double larger more accurate floating point numbers (i.e. to more decimal places or with a larger magnitude)
long (long int) larger integer value range than int if using 16-bit ints.
bool contains either the true or false
value (i.e. a 1 or 0 respectively).
short (short int) smaller integer value range than int
unsigned int 0,1,2,3, etc.
unsigned long 0,1,2,3,4, etc.
Variables may be defined using these types, as illustrated in Figure 2.6, “An example memory space with variables defined.”:
int main()
{
	float a = 25.0;
	int b = 545;
	double c = 123.0;
	char d = 'A';
	bool e = true;
}
The source for this test program is given in
SizeOfVariables.cpp
Using these variables we can assign values to them, modify them and print them to the output if required:
1
2 // Variables Application
3
4 #include<iostream.h>
5
6 int main()
7 {
8 int x = 7, y = 10;  9
10 x=2; // assign x a value 2
11 x++; // increment x by 1
12 x+=2; // increment x by 2
13
14 cout << "x equals " << x << endl;
9
10 x=2; // assign x a value 2
11 x++; // increment x by 1
12 x+=2; // increment x by 2
13
14 cout << "x equals " << x << endl;  15 }
16
15 }
16
The source for this is in
Variables1.cpp
| | You can define several variables on the one line. |
| | At this point, the program will result in an output of |
x equals 5
Variables can be introduced as required!
cin allows values to be read in.
C++ will usually complain if you assign a value of one type to a variable of another type of lower resolution.
Variables can be initialised as they are defined.
We can use the const statement to protect the value
of a variable from change.
A volatile variable is one that
can change outside of the control of the compiler, such as value changed by hardware, threading or interrupts. We use
the volatile keyword to tell the compiler not to perform any form of optimisation on this data. We can
also set this value as const volatile to prevent the programmer from changing this value - It can still
change, but outside the control of the programmer.
There are certain conversion rules for basic types:
1
2 // Using variables with automatic conversion
3
4 #include<iostream.h>
5
6 int main()
7 {
8 int x,y; //(see )
9
10 x = 6.73; // x becomes 6
11 cout << "x = " << x << "\n";
12
13 char c = 'w'; // (see )
14 cout << "c = " << c << "\n";
15
16 x = c; // x becomes the integer
17 // equivalent of 'w' which is 119
18 cout << "x = " << x << "\n";
19
20 y = 2.110; // y becomes 2
21 double d; // (see  )
22 d = y; // d becomes 2.0
23 cout << "d = " << d << "\n";
24
25 const float pi = 3.14159;
26 // (see
)
22 d = y; // d becomes 2.0
23 cout << "d = " << d << "\n";
24
25 const float pi = 3.14159;
26 // (see  )
27 //pi = 223.34; // would be an error if included
28 }
29
)
27 //pi = 223.34; // would be an error if included
28 }
29
The source for this is in
Variables2.cpp
This program will output:
  x = 6
  c = w
  x = 119
  d = 2
We sometimes need to give a variable type another name. We can use typedef to reduce the
apparent complexity of the code, for example:
  typedef unsigned char	uchar;
  typedef unsigned int	cardinal;
  typedef int integer;
  etc..
We can then just use this defined type as normal:
integer x;
You should use this carefully and only were the definition of a necessary data type is required. If you type define int as elephant, it may make your code more interesting, but it will make it difficult for another programmer to comprehend.
One side effect in C++ is that if you are defining:
int* a,b;
it does not create two pointers, rather one int pointer 
a and one int
variable b as the * binds to the right. If you were to use a typedef
for this then we would not have the same problem. E.g.
 typedef int* intPointer;
 intPointer a,b;
declares two pointers a and b, both of type int.
In the development of large C++ applications that involve several different programmers, two programmers could use the same name for a global variable or class, representing related concepts. This would cause complications as such conflicts can have unpredictable results (more likely compiler errors). So, while individual code segments would work independently, when they are brought together errors may result.
The namespace concept was introduced during the standardisation of C++, to allow the programmer to define a namespace that is limited in scope. When writing C++ applications we can make it explicit that we are using the standard namespace by a "using directive":
  using namespace std;    // i.e. I want to use the declarations and
                          // definitions in the "Standard Library"
                          // namespace
at the beginning of our code segments, however this can be considered poor practice in certain circumstances as the entire contents of the
namespace are included. The alternative is to make it explicit that we were calling the
standard cout output stream by typing:
std::cout << "Hello World!" << std::endl;
which states that the cout and endl that we wish to use
are both defined in the std standard library.
It is possible to include the exact namespace member to be included by a "using declaration"::
using std::cout;
would allow us to use cout without including all of the names in the std namespace.
When you include header files you can type #include<iostream.h> or
#include<iostream>, but be careful, there is a difference between the two statements. Writing:
#include<iostream.h>
Is the same as writing:
  #include<iostream>
  using namespace std;
It is possible to create your own namespace, by using the namespace grouping. For example, here I have created a namespace called MolloySpace that contains a function called testAdd. To use this function in the code below you have to use the "using namespace" directive or "using" declaration, otherwise the code will not compile.
  #include<iostream>

  namespace MolloySpace
  {
    float testAdd(float a, float b) { return a+b; }

    class Time
    {
	  public: //etc.
    }
  }

  using std::cout;
  using std::endl;

  using namespace MolloySpace;
  //using MolloySpace::Time;

  ...
The source code for this is in
NameSpaceTest.cpp
![[Note]](images/note.png) | Note |
|---|---|
It is good practice to use a noun (such as your surname) as part of the namespace name. You can have namespaces within namespaces (e.g. DerekSpace
within MolloySpace, but the notation of | |
| Note |
|---|---|
There is a subtle difference in functionality between a using declaration and a using directive when multiple namespaces are used with a common shared name. For example: Assuming we have two namespaces MolloySpace1 and MolloySpace2, but both namespaces have a function someFunction(). If we use the "using directive": using namespace MolloySpace1; using namespace MolloySpace2; There would be no error provided we do not use someFunction() However, if we use the "using declaration" and typed: using MolloySpace1::someFunction; using MolloySpace2::someFunction; This would result in a compiler error and so would be detected. | |
Which should you use? To get the full use of namespaces, it is good to avoid:
using namespace someNameSpace;
Placing such a using directive at the start of every file is the same as placing all definitions in the global namespace - exactly what namespaces were invented to avoid! So, this approach gives little value out of the namespace mechanism. If you place the using directive inside a block, then it only applies to that block; a more sensible approach. The using declaration is better most of the time, inserting statements like:
using theSpace::f;
at the start of a file, allows you to omit names that are in the namespace but that are not used, avoiding potential name conflicts. It also documents which names you use, and it is not as messy as always qualifying a name with notation of the form theSpace::f.
Comments are a necessary evil! A good programmer uses useful comments efficiently in their code. In fact, you may find that sometimes it may clear your head to lay out an algorithm by writing the comments first, before writing even one line of code. We have two types of comments in C++ (i) End of line comment and (ii) block comments.
  x = x * 4.533;  // explain what you are doing
                 // end of line commenting

  /* An example of block commenting */
  y = 5 * 3;

  /* TODO: This section needs to be fixed! Derek 25/12/99
  j = j * 32.7 + 6;
  k = k * j + 1;
  */
Important: You cannot nest /* .. */ comments!
There is a third (and very useful) comment form in Java (/** .. */) that allows for the automatic documentation of code.
Code that is needed in a number of places, should be grouped as a method and called
when required. Methods should be kept as short as possible (including the

main() function).
So to write a simple function that returns a single value we can use:
1 2 // Using Functions/Methods 3 4 #include<iostream> 5 using namespace std; 6 7 float addInterest(float val, float rate)
The source code for this is in
Functions1.cpp
This will result in the output:
After interest your balance is 5250 Euro.
Some points about methods:
If a function/method has a return type then it must return a value!
The void keyword implies that no return value is expected.
void can also mean "type undefined" (to be discussed later).
int is the default return type in C++.
char* is the string type (pointer to characters).
In C if we specified a function with no parameters, e.g. void someFunction()
it actually meant that there was an undeterminded number of parameters, thus disabling type checking. In C++
this means that there are zero parameters.
The previous code segment passed values to the function using pass by value.
In this case you are really passing the value of the variables balance and
iRate, so in this case the numbers 5000 and 5.0.
It is only possible to have one return value when passing by value (However, this value could be a pointer to an array).
If we wish to have multiple return values, or wish to modify the source then we can pass by reference.
This example is the same as the previous example except this time we are passing by reference:
1 2 // Using Functions/Methods (with Pass by reference) 3 4 #include<iostream> 5 using namespace std; 6 7 void addInterest(float &val, float rate)
The source code for this is in
Functions2.cpp
This will result in the output:
After interest your balance is 5250 Euro.
So the output is exactly the same as in the pass-by-value case. Passing-by-reference is like passing a copy of the name of the variable to the method.
| Note |
|---|---|
In C++ you can actually leave out the name of a parameter in a function definition. e.g.
| |
The C++ language has no built-in type for strings, rather they are treated as an array of
the char type terminated by the null character '/0'. A character constant
is an integer represented in inverted quotes around an integer value. For example 'A' = 65, 'a' = 97. ANSI/ISO C++
does provide standard C and C++ libraries for the use of strings.
To use the C standard library for strings in your application use #include<cstring>. The inclusion of the header file
<cstring> actually includes the library <string.h>, but
this is the correct notation as it identifies it as a C header (rather than C++).
1
2 // C String Example
3 // Note - Just for an example, no "using namespace" directive
4
5 #include<iostream>
6 #include<cstring>
7
8 int main()
9 {
10 char s[] = "hello ";
11 char t[] = { 'w', 'o', 'r', 'l', 'd', '!', '\0' };
12
13 // modify the strings directly, replace h with H
14 s[0] = 'H';
15
16 // compare strings
17 if (strcmp(t, "world!") == 0)
18 {
19 strcpy(t, "World!"); //note capital W  20 }
21
22 char *u = strcat (s, t);
20 }
21
22 char *u = strcat (s, t);  23
24 // will output "Hello World!"
25 std::cout << u << std::endl;
26 std::cout << "This string is " << strlen(u)
23
24 // will output "Hello World!"
25 std::cout << u << std::endl;
26 std::cout << "This string is " << strlen(u)  27 << " characters long." << std::endl;
28 }
29
27 << " characters long." << std::endl;
28 }
29 This application will output:
 Hello World!
 This string is 12 characters long.
The source code for this is in
CStringExample.cpp
Table 2.1. The C String Functions Reference
| Function | Description |
char *strcat(char *s, const char *t); | Append string t to string s. The first character of t replaces
the NULL character at the end of s. The new value of s is returned. |
char *strncat(char *s, const char *t, int n); | Append part of string t to string s. The first character of t replaces
the NULL character at the end of s. n determines how many characters to append.
The new value of s is returned. |
char *strcpy(char *s, const char *t); | Assigns string t to string s. The new value of s is returned. |
char *strncpy(char *s, const char *t, int n); | Assigns string t to string s. n determines how many characters to copy.
The new value of s is returned. |
int strlen(const char *s); | Returns the length of s as an integer (excluding the NULL character). |
int strcmp(const char *s, const char *t); | Compare string t to string s. It returns 0 if the strings are the same, less than
zero if the first string is lexicographically less than the second string and
greater than zero if the first string is lexicographically more than the second string. i.e. does the first string come before
or after the second string in the dictionary. |
int strncmp(const char *s, const char *t, int n); | Compare the first n characters of the string t to string s. It returns 0
if the strings are the same, less than zero if the first string is lexicographically less than the second string and
greater than zero if the first string is lexicographically more than the second string. i.e. does the first string come before
or after the second string in the dictionary. |
char *strtok(char *s, const char *t); | This function allows us to break a string s into tokens delimited by the letters contained in
the string t. The first call to the strtok() function should specify the string to
tokenise, but subsequent calls should pass NULL to the first argument to further tokenise the same string. For example:
    char *ptr, s[] = "Hello World";
    ptr = strtok( s, " "); //to break s into individual words

    while (ptr != NULL)
    {
      cout << ptr << std::endl;
      ptr = strtok(NULL, " ");
    }

    // please note that strtok inserts \0 into the " ",
    // so now s = "Hello"
|
The standard library provides us with functionality associated with strings such as concatenation provided by the + operator, assignment with the = operator and comparison with the == operator.
 1
 2 // C++ String example
 3 // Note - Just for an example, no "using namespace" directive
 4
 5  #include<iostream>
 6  #include<string>
 7
 8  int main()
 9  {
10 	// create new string variables
11 	std::string s = "hello ";
12 	std::string t = "world!";
13
14 	// modify the strings directly, replace h with H
15 	s[0] = 'H';
16
17 	// compare strings
18 	if (t == "world!")
19 	{
20 	  t = "World!";	//note capital W
21 	}
22
23 	std::string u = s + t;
24
25 	// will output "Hello World!"
26 	std::cout << u << std::endl;
27 	std::cout << "This string is " << u.length()
28 	     << " characters long." << std::endl;
29  }
30
The source code for this is in
StringExample.cpp
This application will also output:
 Hello World!
 This string is 12 characters long.
Table 2.2. The C++ String Methods
| Method | Description |
append(char *ptr); append(char *ptr, int n); append(string &s, int offset, int n); append(string &s); append(int n, char ch); append(InputIterator Start, InputIterator End); | Appends characters to a string from C-style strings, character arrays or other  String objects. Please
note that we will discuss iterators later on in this module. |
copy(char *cstring, int n, int offset); | Copies n characters from a C-style string beginning at offset. |
*c_str(); | Returns a pointer to C-style string version of the contents of the String object. |
begin(); end(); | Returns an iterator to the start/end of the string. |
at(int offset); | Returns a reference to the character at the specified position. Differs from the subscript operator [], in that bounds are checked. |
clear(); | Clears the entire string. |
empty(); | Tests if a string is empty. |
erase(int pos, int n); erase(iterator first, iterator last); erase(iterator it); | Erases characters from the specified positions. |
find(char ch, int offset = 0); find(char *ptr, int offset = 0); find(string &s, int offset = 0); | Returns the index of the first character of the substring when found. Otherwise, the special value "npos" is returned. |
find_first_not_of(); find_first_of(); find_last_not_of(); find_last_of(); | This has the same sets of arguments as find. Finds the index of the first/last character that is/is not in the search string. |
insert(int pos, char *ptr); insert(int pos, string &s); insert(int pos, int count, char ch); insert(iterator it, InputIterator start, InputIterator end); | Inserts characters at the specified position. |
push_back(char ch); | Inserts a character at the end of the string. |
replace(int pos, int n, char *ptr); replace(int pos, int n, string &s); replace(iterator first, iterator last, char *ptr); replace(iterator first, iterator last, string &s); | Replaces elements in a string with the specified characters. |
size(); | Returns the number of characters in a String object. |
swap(string &s); | Swaps two String objects. |
We have seen the use of the cout output stream. The cin
is the name of the standard input stream. The >> operator allows you to read information
from the input stream and place it in the argument that follows it. For example, we can read in
a value in the following way:
 1
 2  // cin Example
 3  #include<iostream>
 4  #include<string>
 5  using namespace std;
 6
 7  int main()
 8  {
 9    cout << "What is your name?" << endl;
10    string s;
11    cin >> s;
12    cout << "Hello " << s << endl;
13  }
14
The source code for this is in
CinExample.cpp. The output of this
application is:
  What is your name?
  Derek
  Hello Derek
The >> operator ignores spaces, new-line and tab characters in the typed input. The operator has a different behaviour depending on whether strings or numbers are being entered:
When reading in an int >> may take a + or - as a leading character and will read numeric characters until a non-integer character is reached, such as a space, letter or decimal point.
When reading in double/float values a + or - will be accepted as a leading character and it stops at non-numeric characters, but will accept a decimal point. It will accept a leading 0 in front of a value, but it is not required.
When reading in a string, the >> reads in all characters, but does not read in spaces, new line characters or tab characters.
If you enter an invalid value you can call cin.clear() to clear the
stream's fail state. If the same value is entered again then the same problem will recur.
An assignment takes the form: Variable = Expression. There are some
shorthand versions, for example ++x; or x++; is the same as
x=x+1;, or x*=2; is the same as
x = x * 2;
Note that:
  int i = 0;
  while ( ++i < 10)
  {
    cout << i << endl; // outputs 1 to 9
  }
Whereas:
  int i = 0;
  while ( i++ < 10)
  {
    cout << i << endl; // outputs 1 to 10
  }
In the second case the increment takes place after the "less than" comparison. However, be very careful with the for loop case:
  for(int i=0; i<10; i++)
  {
    cout << i << endl; // outputs 0 to 9
  }
Whereas:
  for(int i=0; i<10; ++i)
  {
    cout << i << endl; // outputs 0 to 9
  }
These are both equivalent as the increment takes place after the statement in the loop has been executed.
The scope of a variable is the area in a program where the variable is visible and valid. If we examine the code segment:
	void someMethod()
	{
	  int y = 5;
	  x++; // invalid - x is not defined in someMethod()
	  y++; // valid - y now equals 6
	}

	int main()
	{
	  int x = 1;
	  x++; // valid - x now equals 2
	  y++; // invalid - y is not defined in main()
	}
The variable y is defined in someMethod() and so is only
valid in that method. x is defined in main() function and so is
only valid in that method.
A more complex case can be seen below:
  main()
  {
    int x = 7;
    cout << "x = " << x << endl;
    {
      cout << "x = " << x << endl;
      int x = 2;
      cout << "x = " << x << endl;
    }
    cout << "x = " << x << endl;
  }
This code segment will result in the output:
  x = 7
  x = 7
  x = 2
  x = 7
The first definition of x is initialised with the value 7. This first
x is displayed first and next within the {}. As a new x
is then defined within the {} it now has scope and is displayed on the next line with a value
of 2. Once we go outside the {} then that x variable is destroyed and scope once again
returns to the original x variable, resulting in an output of 7. Although the use of
{} to create an inner level of scope might seem unusual it is only the general case of
for(){}, if(){}, while(){} etc...
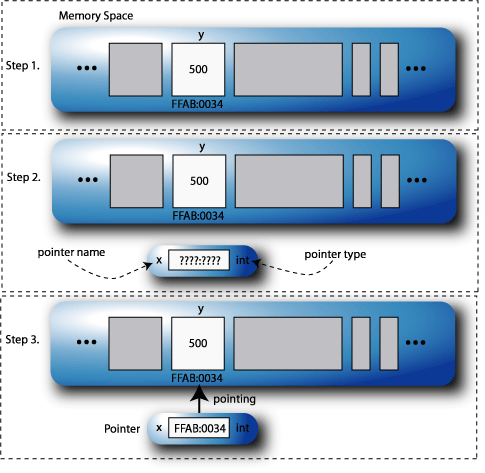
Every variable has two components:
The & operator returns the "address of" the variable. So, if we look at an example piece of code:
  int y = 500;    // define a variable (step 1)
                  // and initialise it to 500
  int *x;	          // define the pointer (step 2)
  x = &y;          // point it at the address of a variable. (step 3)
This example can be illustrated as in Figure 2.7, “An example use of pointers.”.
To find out the value that is "pointed-to" by a pointer x we can use the dereference operator, *x.
The "*" can be thought of as the "value of" a pointer. So to print out the value of x in this
example we could use: cout << "The value of x = " << *x << endl;. In this case we would get an ouput
of The value of x = 500.
Please remember to be aware of the precedence table when using pointers in C++, the section called “Precedence Reference:”.This table specifies the correct
order in which to use operators, so for example to increase the value at pointer x by 1, you might have used:
*x++; and this would be wrong. If you look at the table you will see that ++ comes before *
(the dereference *) in the precendence table (both at level 2). This means that the ++ gets applied to the x
before the dereference *, increasing the value of the pointer by 1 and then uselessly exposing the value of x. If you
change the code to (*x)++; it will work as expected, incrementing the dereferenced x; I would consider it good practice to
use as many () as possible to avoid people having to "learn-off" the precedence table.
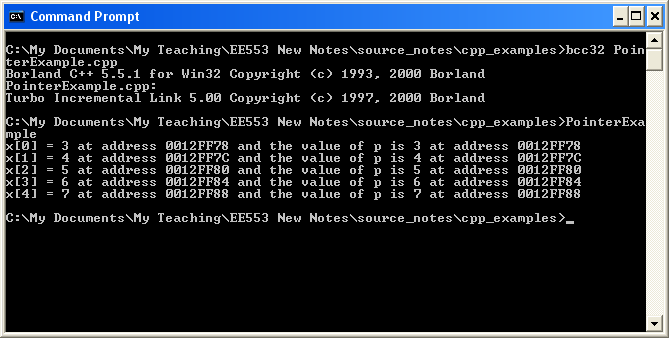
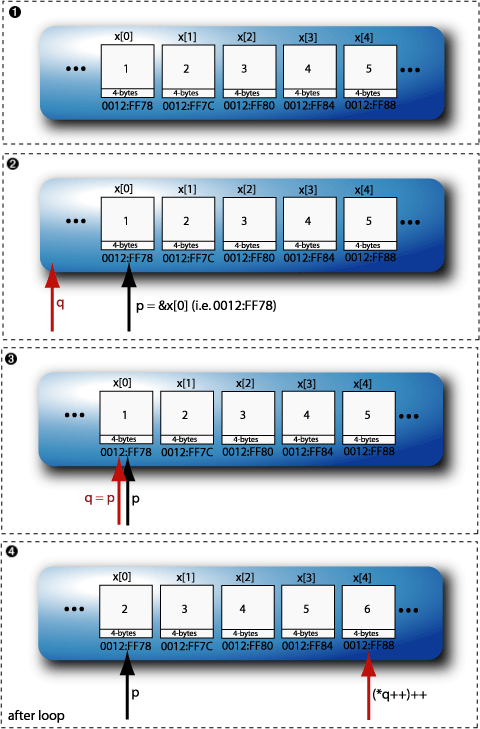
So there are several operations that we can carry out with the use of pointers:
 1
 2 // Pointer Example
 3
 4 #include<iostream>
 5 using namespace std;
 6
 7 int main()
 8 {
 9    int x[5] = {1,2,3,4,5};
10    int *q, *p = &x[0];
11
12    //increment all values in the array by 1
13    q = p;
14    for (int i=0; i<5; i++)
15    {
16       (*q++)++;
17    }
18
19    //reset q pointer again
20    q = p;
21    for (int i=0; i<5; i++)
22    {
23      (*(q+i))++;
24    }
25
26    //do I need to reset q this time? no!
27
28    for (int i=0; i<5; i++)
29    {
30 	cout << "x[" << i << "] = " << x[i] <<
31 		" at address " << &x[i] <<
32                 " and the value of p is " << *(p+i) <<
33 		" at address " << p+i << endl;
34    }
35 }
36
The source code for this is in
PointerExample.cpp
| | The array of int |
| | The two pointers |
| | The |
| | For this point it is important to keep in mind the C++ precedence table (the section called “Precedence Reference:”).
There is a double increment going on at this stage. The pointer address is being
incremented at the same time as the value at the pointer address, but before
this happens, the increment outside the brackets, i.e. |
| | The effect of the previous loop is to move the |
| | For this point it is once again important to keep in mind the C++ precedence table (the section called “Precedence Reference:”).
This loop once again increments even element in the array by 1, but it does it by keeping
the |
| | This outputs the values of the array and the values at the addresses of
|
When run, the output of this application can be seen in Figure 2.8, “The output from an example use of pointers with arrays.”.
This example can be further illustrated in Figure 2.9, “The pointer example in operation, steps 1 to 4 as in the code sample above.” and Figure 2.10, “The pointer example in operation, steps 5 to 7 as in the code sample above.”.
Why does a pointer require a type? When we call *(x+1) (the value at the pointer
plus one position) the amount of bytes travelled to increase the pointer position by 1 will depend
on the data type of x, so if x was of the type int
then the "true" memory pointer would travel 4 bytes, whereas if x was of the
type double then the "true" memory pointer would travel 8 bytes.
In C and C++ we can convert a variable of one type into another type. This is called casting
and we cast using the cast operator () to the left of the data value. When we convert an int into a float
the compiler inserts invisible code to do this conversion and we do not have to deal with casts - this is called implicit casting. However, in
the situation where for example there is a loss of resolution (eg. a float to an int,
e.g. int x = (int)200.6;) then an explicit cast is required. Serious difficulties can occur with 'C' style casts
in C++ as in certain cases a pointer could be made to consider assigned to a value occupying a larger amount of memory than it actually is.
This can damage data surrounding this value if we attempt to change it. We will examine new C++ explicit casts in the next section.
If you state that a pointer is void in C++ it means that it can point to the address
of any type of variable. This feature of the language should probably be avoided unless it is completely
necessary as it allows one type to be treated as another type.
 1
 2  // void pointer example
 3  int main()
 4  {
 5     int a = 5;
 6     void* p = &a;
 7
 8     // *p = 6; would be a compile time error. We must cast back
 9     // to an int pointer before dereferrencing, e.g.
10     *((int *) p) = 6;
11  }
12
The void pointer type cannot be dereferrenced. In this example (int *) p is
the statement that casts p into an int pointer. However, we could just as easily have
cast it to any other pointer type, e.g. a float pointer, in which case modifying such a pointer could
easily crash the program. void pointers are not used in the general language, but we will
have a good use for them later.
A C++ pointer can be assigned to null.
This is a special value in the language, often zero, that signifies that the pointer is not pointing at any value. This is not to be confused with
a pointer pointing to nothing in particular, i.e. an uninitialised pointer. Comparing two pointers, where one is
uninitialised, could result in a positive match by pure chance as the value pointed to by an uninitialised pointer
could have any value. This will not happen with a null pointer. We can set a pointer p
to null by using the statement p = NULL;. NULL is defined in the standard C header
stdlib. This can be included correctly as below:
 // include the C stdlib.h header file
 #include<cstdlib>

 int main()
 {
    int *p = NULL;
 }
Some general points about the C++ language:
can begin with a letter or _
can be followed by letters and digits
are case sensitive
cannot use any of the standard language keywords (new, class etc.)
Table 2.3. Character Constants Table
newline \n | horizontal tab \t | vertical tab \v |
backspace \b | carriage return\r | form feed \f |
bell \a | backslash \\ | question mark \? |
single quote \' | double quote \" | null character \0 |
Multiplicative operators:
a*b a/b a%b (remainder after division, e.g. 10 modulo 4 = 2)
Additive operators:
a+b a-b
Equality operators (boolean return):
a==b (is equal?) a!=b (is not equal?)
Relational operators (boolean)
a<b a<=b a>b a>=b
Logical operators
a==b && a==c (AND) a==c||a<b (OR). Some compilers accept the
and, or and not keywords.
Bitwise operators
<< (left shift) >> (right shift)
[7]
& (bit-wise AND) ^ (bit-wise XOR)
| (bit-wise OR) ~ (bit complement)
Increment and decrement
a++ a-- ++a --a
Unuary operators
-a (negative of a) +i (i)
! (negative logical values) !(a==b) same as (a!=b)
Sizeof operator
sizeof(type) (number of bytes of type is returned)
sizeof expression (number of bytes of expression returned)
So for example:
   int p[5] = {10, 20, 30, 40, 50};
   cout << "Size of int is " << sizeof(int) << " bytes" << endl;
   cout << "Size of the array p is " << sizeof p << " bytes" << endl;
Will result in:
   Size of int is 4 bytes
   Size of the array p is 20 bytes
Conditional operator ?. It has the form
conditionalExpression ? trueExpression1 : falseExpression2, for example:
  // Display the shorter of s and t
  cout << (s.length() < t.length() ? s : t);
Note that the expressions must have the same type.
Note precedence:
a + b * c is the same as a + (b * c) - so be careful and always use ()!
Remember to be careful when comparing values to use == instead of =. If
you write if (x=0) then this is an assignment, not an
equality test, and the effect will be to assign 0 to x. How does it evaluate the
expression to true or false? If the value assigned is zero, it evaluates
it as false; if it is anything else, it evaluates it as true.
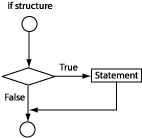
if structure (See Figure 2.11, “The if structure.”):
  if (expression)                   if (x == y)
    {statement}                        { x = x + 5; }
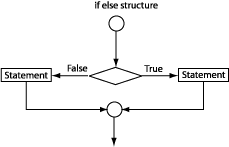
if else structure (See Figure 2.12, “The if else structure.”):
  if (expression)                   if (x>5)
     {if true statement}               { x++; }
  else                              else
     {if false statement}              { x = x + 5; }
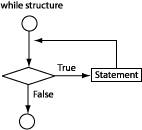
while structure (See Figure 2.13, “The while structure.”):
  while (expression)                while(x<3)
    {statement}                        { x++; }
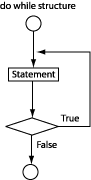
do while structure (See Figure 2.14, “The do while structure.”):
  do                                do
    {statement}                        { x++; }
  while (expression)                while (x<3)
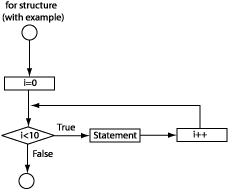
for structure (See Figure 2.15, “The for structure.”):
  for (init, comparison, modifier)  for (i=0; i<10; i++)
    {statement}                        { someFunct(); }
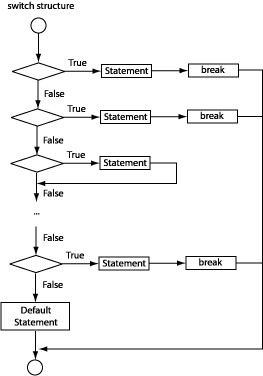
switch structure (See Figure 2.16, “The switch structure.”):
                                          int x = 5;
  switch (int)                            switch(x)
    {                                     {
       case (expression): statement         case 1: cout << "test1";
       case (expression): statement                 break;
       default : (expression)               case 5: cout << "test5";
    }                                               break;
                                            default: cout << "none";
                                          }
Within all of these control statements we can also control the flow using break and continue
keywords. break quits out of the loop/switch, without completing the remaining statements in the loop/switch.
continue on the other hand continues directly to the next iteration of loop without executing the remaining statements in the
loop. The use of these keywords is frowned upon to some extent in programming as loops must be constructed so that it is safe to skip the
remaining statements. For example if the first line of a loop opened a database connection, and the last line closed that connection, a break
in the middle of the loop would result in a "lost" open database connection. Below is a short example to show the use of break and
continue.
  #include<iostream>
  using namespace std;

  int main()
  {
  	for(int i=0; i<10; ++i)
  	{
	    if (i==5) { continue; }
	    if (i==7) { break; }
  	    cout <<"Loop number:" << i << endl;
  	}
  }
The source code for this is in BreakContinue.cpp.
The output of this application is:
  Loop Number:0
  Loop Number:1
  Loop Number:2
  Loop Number:3
  Loop Number:4
  Loop Number:6
When i==5 the cout will be skipped and the loop will continue to the next iteration, but when
i==7 to loop will exit. The most likely place to see a break statement is in some form of infinite loop, such as
while(true){}, so that there is some exit point, as there is no condition to evaluate as false.
I suppose in this discussion I should also begrudgingly mention goto. In 99% of the times you consider the use of goto
there is an alternative solution. The goto keyword was added to the C++ language because it was present in C (and was of appeal to Basic
programmers, where it was necessary). The use of goto makes programs difficult to follow and difficult to debug, but can be used correctly in limited
circumstances. Remember that example above of the break quitting the loop before the database connection is closed; Well one possible solution to that
problem is to use goto. For example we could use:
  int main()
  {
    recordsExist = true;
    while ( recordsExist )
    {
      // open database connection
      // retrieve record

	  if ( record invalid )
	  {
	    recordsExist = false;
	    goto endloop;  // skip remaining statements in loop
	  }

	  // more statements that operate on record
	endloop:
	  // close database connection
	}
  }
Now, I am certain that there is another solution to this issue (such as a single else), but this is just an example of when
you might use a goto. Distant goto calls are not acceptable as it would be
impossible to follow the code, locating the destination in a large section of code.
Table 2.4. C++ Operator Precedence Table
| Precedence | Operator | Description | Example | Associativity |
|---|---|---|---|---|
| 1 | () | Grouping operator | (3+a)*2; | left to right |
| 1 | [] | Array Access | a[0]=10; | left to right |
| 1 | -> | Pointer Member Access | p->balance=0; | left to right |
| 1 | . | Object Member Access | account.balance=0; | left to right |
| 1 | :: | Scoping operator | ::value = 1; | left to right |
| 1 | ++ | Post Increment operator | x++; | left to right |
| 1 | -- | Post Decrement operator | x--; | left to right |
| 2 | ! | Logical Negation | if(!running) | right to left |
| 2 | ~ | Bitwise Complement | x=~x; | right to left |
| 2 | ++ | Pre Increment operator | ++x; | right to left |
| 2 | -- | Pre Decrement operator | --x; | right to left |
| 2 | - | Unary minus | a=-b; | right to left |
| 2 | + | Unary plus | a=+b; | right to left |
| 2 | * | Dereference | a=*ptr; | right to left |
| 2 | & | Address of | ptr=&a[0]; | right to left |
| 2 | (type) | Cast to a type | x=(int)23.6; | right to left |
| 2 | sizeof | Size in bytes | x=sizeof(X); | right to left |
| 3 | ->* | Member Pointer Selector | ptr->*p=1; | left to right |
| 3 | .* | Member Pointer Selector | account.*p=1; | left to right |
| 4 | * | Multiplication | a=b*c; | left to right |
| 4 | / | Division | a=b/c; | left to right |
| 4 | % | Modulus | remainder=b%c; | left to right |
| 5 | + | Addition | a=b+c; | left to right |
| 5 | - | Subtraction | a=b-c; | left to right |
| 6 | << | Bitwise Right Shift | a=b<<1; | left to right |
| 6 | >> | Bitwise Left Shift | a=b>>1; | left to right |
| 7 | < | Less than comparison | if(a<b) | left to right |
| 7 | <= | Less than Equals comparison | if(a<=b) | left to right |
| 7 | > | Greater than comparison | if(a>b) | left to right |
| 7 | >= | Greater than Equals comparison | if(a>=b) | left to right |
| 8 | == | Equals To | if(a==b) | left to right |
| 8 | != | Not Equals To | if(a!=b) | left to right |
| 9 | & | Bitwise AND | a=a&1 | left to right |
| 10 | ^ | Bitwise Exclusive OR | a=a^1 | left to right |
| 11 | | | Bitwise OR | a=a|1 | left to right |
| 12 | && | Logical AND | if(a&&b) | left to right |
| 13 | || | Logical OR | if(a||b) | left to right |
| 14 | ?: | Ternary Condition | x=(a<b)?a:b; | right to left |
| 15 | = | Assignment Operator | x=5; | right to left |
| 15 | += | Increment and Assign | x+=5; | right to left |
| 15 | -= | Decrement and Assign | x-=5; | right to left |
| 15 | *= | Multiply and Assign | x*=5; | right to left |
| 15 | /= | Divide and Assign | x/=5; | right to left |
| 15 | %= | Modulo and Assign | x%=2; | right to left |
| 15 | &= | Bitwise AND and Assign | x&=1; | right to left |
| 15 | ^= | Bitwise XOR and Assign | x^=1; | right to left |
| 15 | |= | Bitwise OR and Assign | x|=1; | right to left |
| 15 | <<= | Bitwise Shift Left and Assign | x<<=2; | right to left |
| 15 | >>= | Bitwise Shift Right and Assign | x>>=2; | right to left |
| 16 | , | Sequential Evaluation Operator | for (int i=0, i<10, i++, j++) | left to right |
© 2006
Dr. Derek Molloy (DCU).
| |  | |
| A First Application |  | Chapter 3. C++ and Object-Oriented Programming |