| Using Other Components | ||
|---|---|---|
 | Chapter 9. Java™ Graphical User Interface(GUI) Components |  |
| Using Other Components | ||
|---|---|---|
| | Chapter 9. Java™ Graphical User Interface(GUI) Components | |
Now that we have seen some of the other components that are available and we have also seen quite a complex event structure for these components an example should help clear up any confusion.
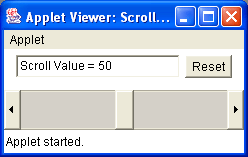
Task: Write the application as shown in Figure 9.18, “A Scrollbar Example Applet” where the

Scrollbar component updates the text in the TextField component when it
is moved. The Reset Button component should set the value of the
TextField object to 0. The Scrollbar component should have the
range 0 to 100.
Solution: You can see this Scrollbar example applet running here -
ScrollbarExample.html and the
code segment is here - ScrollbarExample.java
 1
 2   // A Scrollbar Event Applet
 3
 4   import java.applet.*;
 5   import java.awt.*;
 6   import java.awt.event.*;
 7
 8   public class ScrollbarExample extends Applet implements AdjustmentListener,
 9                                                     ActionListener
10   {
11
12 	private Scrollbar scrollbar;
13 	private TextField status;
14 	private Button resetButton;
15
16 	public void init()
17 	{
18 	  this.setLayout(new GridLayout(2,1));
19 	  Panel topPanel = new Panel();
20
21 	  this.status = new TextField(20);
22 	  this.scrollbar = new Scrollbar(Scrollbar.HORIZONTAL, 50, 10,
23 	                                  0, 110);
24 	  this.resetButton = new Button("Reset");
25
26 	  this.resetButton.addActionListener(this);
27 	  this.scrollbar.addAdjustmentListener(this);
28
29 	  topPanel.add(status);
30 	  topPanel.add(resetButton);
31
32 	  this.add(topPanel);
33 	  this.add(scrollbar);
34
35 	  this.updateText();
36 	}
37
38 	public void actionPerformed(ActionEvent e)
39 	{
40 	  if (e.getActionCommand().equals("Reset"))
41 	  {
42 		this.scrollbar.setValue(0);
43 		this.updateText();
44  	  }
45 	}
46
47 	public void adjustmentValueChanged(AdjustmentEvent e)
48 	{
49 	  if (e.getSource().equals(scrollbar))
50 	  {
51 		this.updateText();
52 	  }
53 	}
54
55 	private void updateText()
56 	{
57 	  status.setText("Scroll Value = " + scrollbar.getValue());
58 	}
59   }
60
To complete this application there are a few points to note:
The ScrollbarExample class implements both the 
AdjustmentListener
and the ActionListener interfaces. A class can implement as many interfaces as
desired. To implement both these interfaces an 
adjustmentValueChanged() method and an
actionPerformed() method both had to be written, otherwise the code would not compile.
I wrote a private method updateText() that updates the 
status
state. I did this as otherwise there would be three different status.setText() calls,
replicating code and leading to unpredictable results if two were changed and one was not.
For the layout I used a 2x1 (i.e. 2 rows, 1 column) GridLayout
with a panel (topPanel) in
the top grid section and the scrollbar object in the bottom grid section. To the
topPanel container I added the status TextField object and
the resetButton Button object. Since the default layout for a
Panel object is FlowLayout the components added are given their
preferred size. Note that because the scrollbar object was added directly to the grid section
it is bound to the grid size and will change size as the applet changes size.
I have called this.updateText() in the init()
method so that the status TextField component will display the
initial value of the scrollbar object.
Note that in the constructor call to Scrollbar the range was set from
0 to 110. We were required by the task to allow a value to be chosen from 0 to 100. We set the maximum at
110 as the width of the bubble is 10 and the value selected is taken from the start of the bubble. So the
maximum range value is always the value desired plus the width of the bubble. Note that when you run this
applet (alternatively see Figure 9.18, “A Scrollbar Example Applet”) you can press on the "arrows" at the left
and right of the Scrollbar component and the value will increment/decrement by 1. If
you press on the area between the bubble and the arrows then the value will increment/decrement by 10 - the
width of the bubble.
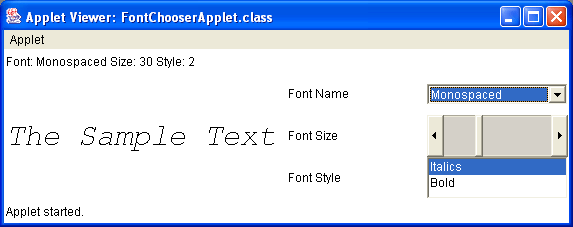
Task: Write an applet that allows you to choose a system font to allow you to
test how it will look. The applet should look like Figure 9.19, “The FontChooser Applet Exercise” where the
Choice component allows you to select the font, the Scrollbar
component allows you to choose the size and the List allows you to style of the
font. The font should be displayed on the left using a Label component. You can see this applet
running at FontChooserApplet.html.
Hints: I have not shown you how to work with Font objects before,
but it is relatively straightforward for this applet. We will need to use Java's logical fonts for this applet as
the component we use to display the text is likely a Label object and this does not support
fonts other than logical fonts, such as physical fonts. So to create a font object use:
Font f = new Font(String name, int style, int size)
Where the name is one of "Serif", "SansSerif", "Monospaced", "Dialog", "DialogInput" strings. The style is one of
Font.REGULAR, Font.BOLD, Font.ITALIC or the sum of any
of these (e.g. Font.BOLD + Font.ITALIC as they are int values).
The size is simply an int from 1 to 100 in my case. So to set the font of a Label
object we could type something like:
 1
 2 	Label myLabel;
 3 	Font f = new Font("SansSerif", Font.BOLD + Font.ITALIC, 12);
 4 	myLabel.setFont(f);
 5
Solution: Do not look at the solution until you have had a good attempt at coding
it yourself. If you get stuck look at my solution at:
FontChooserApplet.java.
Advanced Note: If you need to use fonts other than the logical fonts again. You can get the list of fonts available to you by using:
  GraphicsEnvironment ge =
             GraphicsEnvironment.getLocalGraphicsEnvironment();
  String[] fonts = ge.getAvailableFontFamilyNames();
It will not work in this case as a Label component can only have logical font types.
© 2006
Dr. Derek Molloy (DCU).
| |  | |
| Using these Components |  | Mixing Components and Graphics |