| Dialogs and More Components | ||
|---|---|---|
 | Chapter 12. Swing - Lightweight Components |  |
| Dialogs and More Components | ||
|---|---|---|
| | Chapter 12. Swing - Lightweight Components | |
The 
JDialog class is the key class for creating dialog windows when using the
Swing API. It is a child of the equivalent AWT Dialog class. A dialog is a pop-up
window, usually reasonably small and non-resizable that displays or requests information to or from the user.
You can create your own dialog windows or use some standard dialogs that are available.
A dialog is either modal or non-modal. A modal dialog, once visible does not allow you to interact with the application in any other way, than through the dialog. A non-modal dialog gives you access to the dialog and to the application at the same time.
It is possible to create a very simple dialog using the JOptionPane class. This
class allows you to display a message along with a pre-defined icon.
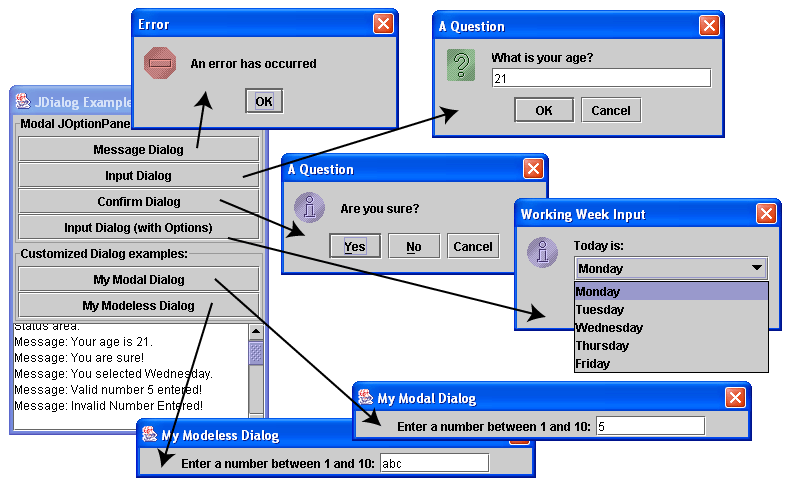
I have written an example to demonstrate most dialog types, as in Figure 12.20, “The Dialog Example Application” and with
the full source code in -
JDialogExample.java.
When the buttons are pressed in Figure 12.20, “The Dialog Example Application” the different dialogs open to demonstrate the different dialog types.
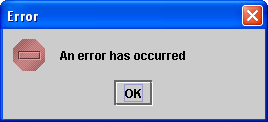
When the first button Message Dialog is pressed an ActionEvent
is generated and a Message Dialog is created as in Figure 12.21, “The Message Dialog”, where all you can do is read
the message and press the "OK" or window "X" buttons.
This is created using the code:
JOptionPane.showMessageDialog(this, "An error has occurred", "Error", JOptionPane.ERROR_MESSAGE);
Where this refers to the parent Component, "An error has occurred" is the
message, "Error" is the title, and JOptionPane.ERROR_MESSAGE is the
pre-defined icon to use.
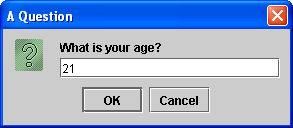
When the second button Input Dialog is pressed an ActionEvent
is generated and an Input Dialog is created as in Figure 12.22, “The Input Dialog”. The Input Dialog allows you
to enter a value that is returned to the calling application as a String object. In this
example the calling application takes the String object and displays it in the
TextArea.
This is created using the code:
	String s = JOptionPane.showInputDialog(this, "What is your age?",
				"A Question", JOptionPane.QUESTION_MESSAGE);
			this.sendMessage("Your age is " + s + ".\n");
Where this refers to the parent Component, "What is your
age?" is the message, "A Question" is the title, and
JOptionPane.QUESTION_MESSAGE is the pre-defined icon to use.
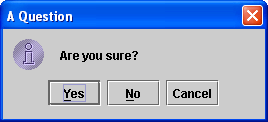
When the third button Confirm Dialog is pressed an ActionEvent
is generated and a Confirm Dialog is created as in Figure 12.23, “The Confirm Dialog”. The Confirm Dialog allows you
to have a selection of options, in this case "yes", "no" and "cancel", which when pressed causes a int
value to be returned to the calling application. In this application the confirm details will be displayed in
the TextArea component.
This is created using the code:
 1
 2
 3 	int selected = JOptionPane.showConfirmDialog(this, "Are you sure?",
 4 	           "A Question", JOptionPane.YES_NO_CANCEL_OPTION,
 5 	           JOptionPane.INFORMATION_MESSAGE);
 6 	if (selected == JOptionPane.NO_OPTION)
 7 		this.sendMessage("You are not sure!\n");
 8 	else if (selected == JOptionPane.YES_OPTION)
 9 		this.sendMessage("You are sure!\n");
10 	else this.sendMessage("You cancelled!\n");
11
12
Where this refers to the parent Component, "Are you sure?"
is the message, "A Question" is the title, YES_NO_CANCEL_OPTION is the
pre-defined button arrangement to use and JOptionPane.INFORMATION_MESSAGE is the pre-defined
icon to use. We can then compare the selected int value to the defined values of
JOptionPane.NO_OPTION or JOptionPane.YES_OPTION
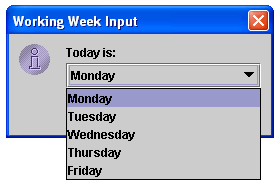
When the fourth button Input Dialog (with Options) is pressed an ActionEvent
is generated and an Input Dialog is created as in Figure 12.24, “The Input Dialog with Options”. The Input Dialog allows you
to have a selection of options that you can choose from a pull down list. In this application the selected
value will be displayed in the TextArea component.
This is created using the code:
 1
 2
 3 	String[] theDays = {"Monday", "Tuesday", "Wednesday", "Thursday", "Friday" };
 4 			String selected = (String) JOptionPane.showInputDialog( this,
 5 					"Today is: ", "Working Week Input",
 6 					JOptionPane.INFORMATION_MESSAGE, null,
 7 					theDays, theDays[0]);
 8 			this.sendMessage("You selected " + selected + ".\n");
 9
10
Where first off an array of String is created and this is passed as the options to the
input dialog. The call to the input dialog will return an Object object that can be
cast converted to a String objects, as the list we passed is an array of
String objects. The method call 
showInputDialog() expects the
parameters, Where this refers to the parent Component,
"Today is: "is the message, "Working Week Input" is the title,
JOptionPane.INFORMATION_MESSAGE is the pre-defined icon to use, null is
a separate Icon object to use, theDays is the array of
Object expected and theDays[0] is the inital selection.
When the fifth and sixth buttons My Modal Dialog and My Modeless Dialog
are pressed an ActionEvent is generated and a special MyDialog is
created as in Figure 12.25, “The MyDialog (modal and modeless look the same)”. This dialog is our own implementation of JDialog
where MyDialog is a child class of JDialog providing our own
specific requirements. In this case it creates the GUI to request a number between 1 and 10 and validates to
ensure that the number is indeed in this range. Invalid results and correct results are sent to the
main application, as the MyDialog is passed a reference to the main application in its
constructor.
This is created using the code:
 1
 2
 3   In the main application....
 4
 5   else if(e.getSource().equals(myDialogButton))
 6   {
 7 	 myDialog = new MyDialog(this, "My Modal Dialog", this, true);
 8   }
 9   else if(e.getSource().equals(myModelessButton))
10   {
11     myDialog = new MyDialog(this, "My Modeless Dialog", this, false);
12   }
13   ....
14
15   // The MyDialog class implementation
16
17   class MyDialog extends JDialog implements ActionListener
18   {
19     private JTextField entryField;
20     private JDialogExample callingApp;
21
22     public MyDialog(Frame frame, String title, JDialogExample callingApp,
23                       boolean isModal)
24     {
25       super(frame, title, isModal);
26       this.callingApp = callingApp;
27
28       this.getContentPane().setLayout(new FlowLayout());
29       this.getContentPane().add(new JLabel("Enter a number between 1 and 10:"));
30       entryField = new JTextField(10);
31       entryField.addActionListener(this);
32       this.getContentPane().add(entryField);
33
34       //prevent the dialog from closing without a value
35       this.setDefaultCloseOperation(JDialog.DO_NOTHING_ON_CLOSE);
36
37       this.setSize(400,60);
38       this.show();
39     }
40
41     public void actionPerformed(ActionEvent e)
42     {
43       String entry = entryField.getText();
44       try{
45         Integer i = new Integer(entry);
46         if (i.intValue()<=10 && i.intValue()>=1)
47         {
48           callingApp.sendMessage("Valid number "+ i +" entered!\n");
49           this.dispose();
50         }
51         else
52         {
53           callingApp.sendMessage("Invalid Number Entered " + i +"!\n");
54         }
55       }
56       catch (NumberFormatException exept)
57       {
58         callingApp.sendMessage("Invalid Number Entered!\n");
59       }
60     }
61   }
62
63
So at the top of this segment of code, if the ActionEvent was generated by either
the fifth or sixth buttons then and instance of my Dialog class MyDialog is created
and then runs. There are two forms here, modal and modeless, and all that differentiates between the calls is
the true and false values that are passed to the parent class of
MyDialog JDialog through the super()
call. A modal dialog box takes all control and will not allow you to press any other place in the same program,
whereas the modeless dialog box allows you to still use the calling application in full. There are many different
reasons for using either
The MyDialog is passed a reference to the calling application to its constructor
called 
callingApp. This is important as it allows us to communicate with the calling
application to call its public sendMessage() method. The constructor then sets up the
display by adding a JLabel and JTextField components. One unusual
call in the constructor is to the method setDefaultCloseOperation(JDialog.DO_NOTHING_ON_CLOSE)
which prevents the user from pressing the "X" button in the frame of the dialog to avoid entering a value - try
it! The actionPerformed() method takes the input from the JTextField
when enter is pressed in the field and validates the data in that field. It tries to convert the
String into an Integer, which will throw an

NumberFormatException if invalid text, such as "abc" is entered. If this exception
does not occur then the Integer object will be converted to an int variable
and checked if it is in the range 1 to 10. If it is then the MyDialog dialog will pass
the value back to the calling application through the calling application's sendMessage()
method. The dialog will then dispose of itself.
Remember that the code for all these examples is in file -
JDialogExample.java. You should compile and
run this example if you do not understand the difference between modal and modeless. Press the sixth button and
then press another dialog button, try to do this with any other combination. The only modeless dialog is the
last dialog in this example.
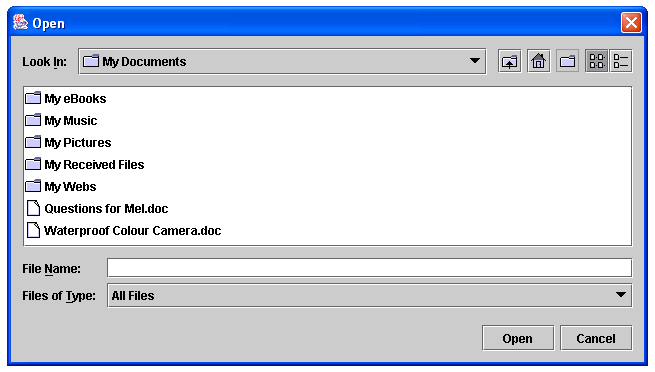
The file cooser dialog is a useful dialog that allows you allow the user of your application to browse
their filesystem to find a file or folder. The JFileChooser is the Swing implementation
of the file chooser and has several powerful features, such as allowing you to browse for certain types of
file only (such as .gif images), or to even provide a preview of the files you are browsing.
Figure 12.26, “The JFileChooser Dialog in Action.” shows an example of the JFileChooser in operation.
To create the dialog as shown in Figure 12.26, “The JFileChooser Dialog in Action.” use something like the following code:
 1
 2
 3   JFileChooser chooser = new JFileChooser();
 4   int returnVal = chooser.showOpenDialog(this);  // where this is the parent component
 5   if(returnVal == JFileChooser.APPROVE_OPTION)
 6   {
 7      File f = chooser.getSelectedFile();
 8      System.out.println("You have chosen " + f.getName());
 9   }
10
11
In this case a default JFileChooser was created, a current directory can be passed
to the constructor as a File object. When the showOpenDialog()
method is called, the return value define if open or cancelled was pressed. If the open button was pressed
then an int value of JFileChooser.APPROVE_OPTION will be returned. Once
a file has been chosen you can obtain a reference to the file that was chosen, as an object of the file
pointer java.io.File. This class allows you to perform operations on files, such as
opening, closing, deleting. Other useful methods of this class are isDirectory()
which return a boolean to define if the chosen file is a directory. length()
returns a long that gives the size of the file in bytes. getPath()
returns the path of the files as a String object.
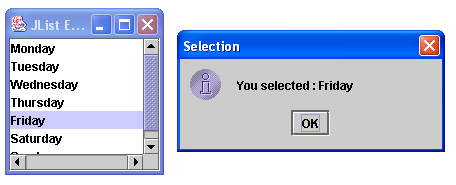
The JList is the Swing replacement for the java.awt.List
component. It differs from the AWT component in that it displays an array of Objects, not
just an array of String. This allows you to create complex displays, such as displaying
images in the JList component. It is common to use a Vector of
objects to hold the data. Once again, this component does not support scrolling, you must pass this task onto a
component such as JScrollPane.
The code for this example is given below and in
JListExample.java
 1
 2
 3   // Swing JListExample - Derek Molloy
 4
 5   import javax.swing.*;
 6   import javax.swing.event.*;
 7   import java.awt.*;
 8   import java.awt.event.*;
 9
10   public class JListExample extends JFrame implements ListSelectionListener
11   {
12 	JList myJList;
13
14 	public JListExample()
15 	{
16 	  super("JList Example");
17
18 	  String[] data = {"Monday","Tuesday","Wednesday","Thursday","Friday","Saturday","Sunday"};
19
20 	  myJList = new JList(data);
21 	  myJList.addListSelectionListener(this);
22
23 	  JScrollPane p = new JScrollPane(this.myJList,
24 	      JScrollPane.VERTICAL_SCROLLBAR_ALWAYS,
25 	      JScrollPane.HORIZONTAL_SCROLLBAR_ALWAYS);
26
27 	  this.getContentPane().add("Center", p);
28
29 	  this.pack();
30 	  this.show();
31 	}
32
33 	public void valueChanged(ListSelectionEvent e)
34 	{
35 	  JOptionPane.showMessageDialog(this, "You selected : " + myJList.getSelectedValue(),
36 			"Selection", JOptionPane.INFORMATION_MESSAGE);
37 	}
38
39 	public static void main(String[] args)
40 	{
41 	  new JListExample();
42 	}
43   }
44
45
The list is populated by a String array, by passing the array to the constructor of the
JList class. You can add an 
ListSelectionListener listener to the
JList component. In this case the JListExample class is responsible
for handling the ListSelectionEvent event object and so according to the
ListSelectionListener interface the class must implement the
valueChanged() method that receives a ListSelectionEvent event
object. This application is very annoying to use, as it pops up a dialog every time you select any item from the list
component. The dialog is created using the JOptionPane class as discussed in
the section called “Dialogs”.
The JList component allows for the multiple selection of items in the list. If you
use the method myList.setSelectionMode(ListSelectionModel.MULTIPLE_INTERVAL_SELECTION) you
can have multiple selection (it is actually the default state). To get the multiply selected items you can call
the getSelectedValues() that returns an array of Object that can be
appropriately cast converted to an array of String if required. Another useful method is
the getSelectedIndex() that returns an int variable, defining the position
of the item in the list that was selected. getSelectedIndices() returns an array of
int if multiple selection is allowed.
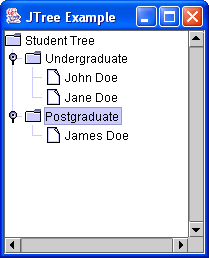
The JTree is very useful for displaying any type of hierarchical data. It displays
data in the form of a real tree, with nodes, branches etc. Figure 12.28, “The JTree Example Application” shows a very basic
tree in operation. You can set the JTree so that events are generated whenever the tree is
expanded or collapsed, or when a particular cell is selected.
The code for this example is given below and in -
JTreeExample.java
 1
 2   // Swing JTreeExample - Derek Molloy
 3
 4   import javax.swing.*;
 5   import java.awt.*;
 6   import java.awt.event.*;
 7   import javax.swing.tree.*;
 8
 9   public class JTreeExample extends JFrame
10   {
11 	private JTree myTree;
12
13 	public JTreeExample()
14 	{
15 		super("JTree Example");
16
17 		DefaultMutableTreeNode top = new DefaultMutableTreeNode("Student Tree");
18 		myTree = new JTree(top);
19 		DefaultMutableTreeNode ugNode = new DefaultMutableTreeNode("Undergraduate");
20 		DefaultMutableTreeNode johnDoe = new DefaultMutableTreeNode(
21 			new Student("John Doe", "912345676", "EE1"));
22 		DefaultMutableTreeNode janeDoe = new DefaultMutableTreeNode(
23 			new Student("Jane Doe", "912345677", "ME1"));
24 		DefaultMutableTreeNode pgNode = new DefaultMutableTreeNode("Postgraduate");
25 		DefaultMutableTreeNode jamesDoe = new DefaultMutableTreeNode(
26 			new Student("James Doe", "912345678", "GDE1"));
27
28 		top.add(ugNode);
29 		ugNode.add(johnDoe);
30 		ugNode.add(janeDoe);
31 		top.add(pgNode);
32 		pgNode.add(jamesDoe);
33
34 		JScrollPane p = new JScrollPane(this.myTree,
35 			JScrollPane.VERTICAL_SCROLLBAR_ALWAYS,
36 			JScrollPane.HORIZONTAL_SCROLLBAR_ALWAYS);
37
38 		this.getContentPane().add("Center", p);
39
40 		this.pack();
41 		this.show();
42 	}
43
44 	public static void main(String[] args)
45 	{
46 		new JTreeExample();
47 	}
48   }
49
50   class Student
51   {
52 	private String name;
53 	private String id;
54 	private String classname;
55
56 	Student(String name, String id, String classname)
57 	{
58 		this.name = name;
59 		this.id = id;
60 		this.classname = classname;
61 	}
62
63 	public String toString()
64 	{
65 		return name;
66 	}
67   }
68
69
There are a few important points to note in this example. First off, the javax.swing.tree
package must be imported if you wish to use the default tree nodes. In this application I have used the
relatively straightforward DefaultMutableTreeNode for all my nodes, even the root node, by
using the node object passed to the constructor of JTree. I have created a temporary
Student class to use as the objects in the tree. Note that in this class the
toString() method inherited from Object is over-ridden, to provide
our own support for converting a Student object into a String object.
This allows for the object to be displayed correctly on our tree. The nodes are added to other nodes and thus the
tree builds up.
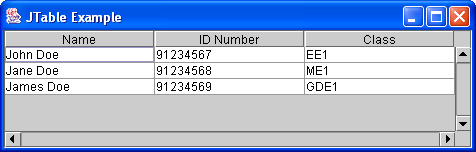
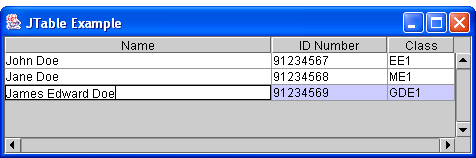
The JTable Class has many uses in displaying data in rows and columns, very useful in
the display of a database lookup query. Figure 12.29, “The JTable Example Application. (a) As it appears on startup (b) moved and edited a bit” shows an example of a basic table in
operation. In (a) you can see that the table is displaying a set of strings in a row/column layout. The titles
are given on the top of the columns and the component allows you to move the dividers between cells, just like
you can in Excel. As you can see in (b) the contents of the cells can be edited by default. There is no storage
mechanism at this stage, you are simply editing the data on the table component.
Figure 12.29. The JTable Example Application. (a) As it appears on startup (b) moved and edited a bit
The code for this example is given below and in
JTableExample.java
 1
 2
 3   // Swing JTableExample - Derek Molloy
 4
 5   import javax.swing.*;
 6   import java.awt.*;
 7   import java.awt.event.*;
 8
 9   public class JTableExample extends JFrame
10   {
11 	JTable myTable;
12
13 	public JTableExample()
14 	{
15 	  super("JTable Example");
16
17 	  String[] columnNames = {"Name", "ID Number", "Class"};
18 	  String[][] data = {{"John Doe", "91234567", "EE1" },
19 		     {"Jane Doe", "91234568", "ME1" },
20 		     {"James Doe", "91234569", "GDE1" }};
21
22  	  myTable = new JTable(data, columnNames);
23
24 	  JScrollPane p = new JScrollPane(this.myTable,
25             JScrollPane.VERTICAL_SCROLLBAR_ALWAYS,
26             JScrollPane.HORIZONTAL_SCROLLBAR_ALWAYS);
27
28 	  this.getContentPane().add("Center", p);
29
30 	  this.pack();
31 	  this.show();
32 	}
33
34 	public static void main(String[] args)
35 	{
36 	  new JTableExample();
37 	}
38   }
39
40
If you wish to allow selection of the table you can add a ListSelectionInterface
interface to the JTable, just like for JLIst in
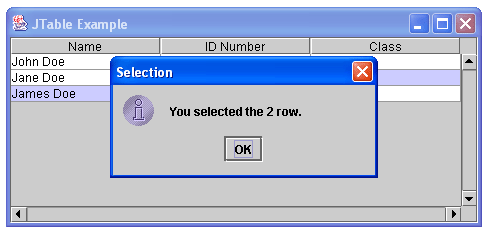
the section called “The JList Class”. Figure 12.30, “The JTable Example Application with ListSelection events.” shows an example with ListSelection
events associated with the table. When you select a row the dialog will pop-up to say that you have selected that
row.
The code for this example is given below and in -
JTableExample2.java
 1
 2
 3   // Swing JTableExample2 - Derek Molloy
 4   // 	Table with events added in.
 5
 6   import javax.swing.*;
 7   import javax.swing.event.*;
 8   import java.awt.*;
 9   import java.awt.event.*;
10
11   public class JTableExample2 extends JFrame implements ListSelectionListener
12   {
13 	JTable myTable;
14
15
16 	public JTableExample2()
17 	{
18 		super("JTable Example");
19
20 		String[] columnNames = {"Name", "ID Number", "Class"};
21 		String[][] data = {{"John Doe", "91234567", "EE1" },
22 				   {"Jane Doe", "91234568", "ME1" },
23 				   {"James Doe", "91234569", "GDE1" }};
24
25  		myTable = new JTable(data, columnNames);
26 		myTable.setSelectionMode(ListSelectionModel.SINGLE_SELECTION);
27
28 		ListSelectionModel selectModel = myTable.getSelectionModel();
29 		selectModel.addListSelectionListener(this);
30
31 		JScrollPane p = new JScrollPane(this.myTable,
32 			JScrollPane.VERTICAL_SCROLLBAR_ALWAYS,
33 			JScrollPane.HORIZONTAL_SCROLLBAR_ALWAYS);
34
35 		this.getContentPane().add("Center", p);
36
37 		this.pack();
38 		this.show();
39 	}
40
41 	public void valueChanged(ListSelectionEvent e)
42 	{
43 		ListSelectionModel lsm = (ListSelectionModel)e.getSource();
44 		int selectedRow = lsm.getMinSelectionIndex();
45 		JOptionPane.showMessageDialog(this, "You selected the " + selectedRow + " row.",
46 			"Selection", JOptionPane.INFORMATION_MESSAGE);
47
48 	}
49
50 	public static void main(String[] args)
51 	{
52 		new JTableExample2();
53 	}
54   }
55
56
In this example the selection mode is set from multiple to single, so that only one row may be selected at a
time. The ListSelectionModel interface object defines the selection model for
the JTable, allowing us to associate the ListSelectionListener
interface with the selection process. When a ListSelectionEvent object is generated this
is handled by the valueChanged() method, where we can interrogate the event object
e to get the selected index of the event, through the ListSelectionModel
interface.
© 2006
Dr. Derek Molloy (DCU).
| |  | |
| Toolbars and Multiple Container Classes |  | An Exercise for You. The Image Loader Application |